12.30.2009

Better Than the "Real" Thing - Waaaay Better

So, the title of this post sets the bar really high, but I have to say that this recipe lives up to the hype. This recipe was originally described as "grown up Oreos," but I think they're waaaay better than Oreos. These cookies are so unassuming. They look plain and bland, but they are anything but boring. The cookies are wafer like - with a dark chocolate taste and a hint of saltiness. The filling isn't the usual pseudo buttercream (which I shouldn't knock, because the overly sweet powdered sugar/butter combo has its rightful place among baked goods). Instead, the filling is a creamy white chocolate ganache that balances the crispness of the chocolate wafers surrounding it.

I make the dough a day ahead of time, and roll it out in two batches. Each half of the dough is rolled between two pieces of parchment paper. Then I place them on top of an inverted cookie sheet, and place it in the fridge. (The cookie sheet allows me to easily remove the thin sheets of cookie dough without fear of destroying the dough while transporting it from the fridge to the kitchen counter.) One more important tip about the cookies: Do NOT store them in an airtight container because the cookies will become soggy and soft. I would suggest placing them in a traditional cookie jar or cake platter with a domed top in order to retain a crisp cookie.

Without further delay, here's the recipe for Double-Chocolate Sandwich Cookies (from Gourmet):

Ingredients:

For the Dough:
2 cups all-purpose flour
1/2 cup unsweetened Dutch-process cocoa powder
1/2 teaspoon baking powder
1/2 teaspoon salt
2 sticks (1/2 pound) unsalted butter, softened
3/4 cup sugar
1 large egg yolk
1 teaspoon pure vanilla extract

For the Ganache:
1/2 cup heavy cream
1 1/2 tablespoons light corn syrup (I use golden syrup because I don't like corn syrup. Golden syrup is available from whole foods.)
3/4 pound fine-quality white chocolate, melted
2 tablespoons unsalted butter, softened
2 teaspoons pure vanilla extract

Directions:
For the Dough:

Whisk together the dry ingredients (not including the sugar).

Beat butter and sugar with an electric mixer until pale and fluffy, then beat in yolk and vanilla. At low speed, mix in flour mixture in 3 batches just until a dough forms. Divide dough in half and form into a disk, then chill, wrapped in plastic wrap, until firm, 2 to 3 hours.

While the dough chills, make the ganache:

Bring cream and corn syrup just to a simmer in a small heavy saucepan, then stir into melted chocolate. Stir in butter and vanilla until smooth. Cover surface with cling wrap and chill, stirring occasionally, until very thick, about 30 minutes.

Back to the Cookies:

Preheat oven to 350°F with rack in middle. Line two 2 large baking sheets with a silicone liner or parchment paper.

Roll out 1 piece of dough between sheets of parchment paper about 1/8 inch thick. Slide dough in parchment onto a tray and freeze until dough is firm, about 10 minutes. Repeat with remaining dough.

Cut out as many rounds as possible with a 1 3/4 inch round cookie cutter, reserving and chilling scraps, then quickly transfer cookies to a buttered baking sheet, arranging them 1/2 inch apart.

Bake cookies until baked through and slightly puffed, 10 to 12 minutes. Cool on sheet on rack 5 minutes, then transfer to rack to cool completely (cookies will crisp as they cool).

Assemble Cookies:

Beat ganache with an electric mixer at high speed just until light and fluffy. Spread ganache onto flat sides of plain cookies, then top with another cookie to make sandwiches. Chill, layered between sheets of parchment, in an airtight container until filling is set, at least 1 hour.

Makes about 3 to 3 1/2 dozen cookies.

12.03.2009

Toasty Valentines for My Valentines

So, yes, I am posting this almost a year (eeeks! talk about procrastination) after I completed this hilariously cute project. But I guess that it's better late than never (unfortunately that seems to by my mantra when it comes to knitting because I'm always behind on wip's). My Hubs and I were over the moon about becoming parents to our spunky little gal. So, for Valentine's day, I made the two loves of my life matching winter hats. It's from a pattern called Sarah's Cabled Hat (you have to be a member of Ravelry to view the link). The pattern is written for adults, so my modification was to make the hats out of a light fingering weight yarn (Dale of Norway/Dalegarn Baby Ull to be exact). I held the yarn in a single strand for Sweetie Mama and double strand for the Hubs.

7.31.2009

Cookies for Sweetie Mama's First Birthday

So, I've baked literally dozens of cakes and desserts for my family's special occasions (birthdays, weddings, engagement parties, etc.), so how could I pass up on making something for my daughter's first birthday. Yes - there will be almost 200 people there, but I'm crazy enough to attempt to bake something. I cannot let go...

So, I decided the most practical items for me to make are cookies. I'm planning on having chocolate chocolate chip, sugar cookies, and chocolate chip cookies. Now, you might be thinking, "Well that's boring." But actually, purchasing good quality cookies is rather expensive. Supermarket bakery cookies just don't cut it for me. I love the chocolate, chocolate chip cookies from Panera. Mmmmmmm, so good.
So, here's my version minus the nuts (due to my nephew's allergies to nuts) and white chocolate.

Chocolate Chocolate Chip Cookies
1 3/4 cup all purpose flour
1/2 cup unsweetened cocoa powder (not Dutch process)
3/4 tsp. baking soda
1/4 tsp. salt
1 cup (2 sticks) unsalted butter, softened
1 cup sugar
1/4 cup packed light brown sugar
1 large egg
1 1/2 tsp. vanilla
2 cups chocolate chips (I like to use bittersweet chocolate chips)

Sift the dry ingredients together in a medium bowl. Beat the butter and sugars together until light and fluffy. Then beat in the egg and vanilla until well combined. Beat in the flour mixture until just combined and stir in the chips.

Make sure to space the cookies about 2 inches apart on an ungreased cookie sheet. Bake at 350 degrees for about 12 minutes.

Makes about 4 dozen cookies.

For these cookies I used Hershey's special dark chocolate cocoa powder. It gave the cookies a nice, deep, chocolate taste without a lot of sweetness. I felt like it was as chocolaty as a Dutch process cocoa.
I have a rather strong type A personality (I think that's the only strength Type A personalities actually come in - honestly, have you ever heard of a mild Type A personality? Mild and Type A do not fit together), so I like to be organized, clean, and efficient when I cook/bake. Below are my ingredients all measured out, ready to be mixed, rolled, baked, and devoured in the form of a chocolaty bundle of satisfaction (otherwise known as a chocolate chocolate chip cookie).

Here's the batter ready to be scooped and baked:


Finally - behold the cookie! (I can't tell you how many of these I had to eat before packing them away for the party. Let's just say that I probably gained about five pounds worth of cookies!)

I'm still here...I promise!

It's been almost six months since I last posted on my blog! I can't believe how quickly time flies. In the past six months, I've had to do some major prioritizing. First things first - I had to quit TWD and The Cake Slice Bakers. The baking was becoming more stressful than enjoyable, and it was turning my hobby of baking into something I did not look forward to at all! The next major priority was for me to lose my baby weight. I was sick of not being able to wear anything, and more importantly, I am determined to set a healthy example for my little one. I have a bit of weight to go, but I'm feeling pretty good. My new best friend is my Bob Sport Utility jogging stroller. I LOVE it, and more importantly my daughter loves the ride and the fresh air.


I'm up to running five miles five to six days a week. Before pregnancy I loved running, but never outside. Now I can't imagine running on a treadmill. It seems so boring! I'm hoping my sweetie mommy (my daughter) and I will run a race this fall.


We just returned from a wedding in Boston (actually western Massachusetts). We spent four days in Boston before the wedding, and had a blast. I'm currently in the throws of planning the little one's first birthday! I'm also going to be helping my sister and sister in-law host a small dinner party for our other sister's tenth (yes 10 years!) wedding anniversary.


2.16.2009

TWD - Devils Food White Out Cake

I was really excited to make this weeks TWD. The cake looked phenomenal on the cover of the book, and who doesn't love chocolate cake? It was my niece's birthday (Happy third birthday Choocher!), so I thought, why not make life easier and combine TWD and a family birthday. The frosting was easy to prepare, but I have to admit that it took a lot longer for the syrup to reach the right temperature before beating it into the egg whites. Other than that small unexpected twist, the frosting came together beautifully. 

I've never decorated a cake with cake crumbs because it always seems so untidy to me, but I thought I'd give it a shot this time. Crumbling the cake was a lot more fun than I expected (I actually thought I'd find it unsettling - ripping apart a perfectly nice cake layer). It also gave me an opportunity to taste the cake, and it was phenomenally moist, chocolatey, and delicious with the addition of the chocolate pieces. 

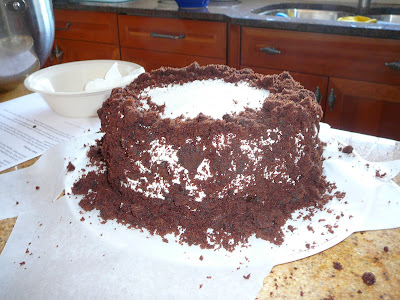
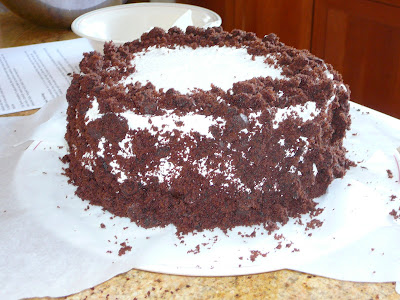
The finished cake actually did look untidy with the crumb decoration, but it still tasted delicious! I had so many crumbs that I put some on top of the cake as well. I left enough space so that I could pipe "Happy Birthday." 

Here's the inside of the cake. The picture is horrible, but the inside layers held up pretty well once cut. I have to say that the frosting wasn't my favorite. Its texture became too sticky and unpleasant after it was refrigerated. Overall the cake was pretty good, but the consensus in my family was that I've made many other chocolate cakes that were a lot tastier! Let's see what next week brings...


1.20.2009

Berry Surprise Cake

My very first TWD post! I was so excited (still am) to be part of Tuesday's With Dorrie. When I got the cookbook, I eagerly read through many of the recipes (especially the pies!). I have to say that I would have never chosen to bake this cake if it wasn't for TWD (especially now because berries are so out of season). Before baking, I read some of the other bakers' experiences with the recipe wich proved to be very helpful. (Thank you to the other TWD bakers for the advice!)

I made some alterations of the recipe. First of all, like the other bakers suggested, I added more sugar to the filling. I added 1/2 cup of powdered sugar. I chose to add powdered sugar because I was affraid the addition of too much granulated sugar would cause the filling to be grainy.

The other changes I made was not out of choice but necessity, and they were all a result of the cake falling (rather collapsing) once it came out of the oven and cooled. In order to use the filling, I had to cut the cake in half (horizontally) to create two layers. Then I frosted it.

As for the taste, the cake tasted pretty good if one could get over it's tough texture. The filling, with the additional sugar, was the star of the cake. If berries were in season, then maybe they would have been the star of the cake. As a complete cake, the flavors were pretty well balanced (the tartness of the creamcheese off set the sweetness of the cake). I don't think I'll ever make this cake again, but I may use the filling with another cake recipe.

1.17.2009

The Never Ending Search for THE Chocolate Chip Cookie Recipe

I'm crazy about chocolate chip cookies (or have chocolate chip cookies made me crazy? hmmmm....) Since I can remember I've been obsessed with finding the perfect recipe for these delicious treats. Actually, I shouldn't say "the" prefect recipe because I've actually been on the hunt for two very different, yet equally perfect, chocolate chip cookie recipes. 

In my opinion, the vast world of chocolate chip cookies can be classified into three main categories: 1) Thin, crispy, crunchy cookies (not my favorite by far). 2) Chewy, soft chocolate chip cookies (love these) 3) The thick, fudge-like cookie that packs a punch. The fudge-like cookie I'm referring to in particular is the Carol's Cookies species. I first discovered Carol's Cookies in college. I lived in an apartment across the street from Whole Foods, and I stumbled upon these gems one fateful afternoon. 

In my quest for the perfect chocolate chip cookie recipes, I've been working on variety number two (soft, chewy) of late. I need to learn more about baking science before even attempting to recreate Carol's Cookies. 

These one's turn out pretty well. They are an adaptation of the Ghirardelli chocolate chip cookies.  Here's the recipe:

11 ounces of semisweet chocolate chips
2 3/4 cups of all purpose flour
1 1/4 tsp. baking soda
1/2 tsp. salt
1 cup butter softened
3/4 cup granulated sugar
3/4 cup packed brown sugar
2 eggs
1 tsp. vanilla
1 cup chopped walnuts

Bake in a preheated 375 degree oven for 8 to 9 min. They may look underdone when taken out of the oven, but they continue to cook as they cool. They are delicious!


This entire plate of cookies was gone in one afternoon when guests came over for tea. I'm already thinking about ways to make it even better...hmmm.....

There's No Such Thing as Blue Food...

A few weeks ago on Top Chef (I love that show!) the challenge was for the chef's to cook a course based upon a theme. Fabio's team (Fabio is my fan favorite of this season) received the color blue as their theme. As the chef's were prepping their dishes, Tom Colicchio said something about there being no such thing as blue food. Upon hearing that, I became obsessed with trying to find a food that's naturally blue... and gosh darn it, I think Chef Colicchio was right! Blueberries? No - they're purple. Blue potatoes - again, nope. Purple. (You get the picture...)

Anyhow, the reason this is relevant is because I was planning to knit a hat/mitten set for my husband's cousin's baby girl's first birthday (wow that's a mouth full). The pattern I decided on was Ann Norling's Kid Fruit Cap. I found some beautiful blue yarn, so I thought, I'll make a blueberry hat. Little did I realize that there's no such thing as blue food! Regardless, I think the hat and mittens turned out thoroughly adorable.

1.11.2009

The First Annual Mother-Daughter Cookie Exchange


I always wanted to host a cookie exchange, but I never managed to get my act together in time for the holidays. This year I actually did it! It was a bit insane on my part because my daughter was only three months old, but with my husband, sister in-law, mom, and sisters' help, we did it! It turned out great. I'm all about starting traditions, and this is one I'd love to start with my own daughter. Above is a photo of about 3/4 of the cookies from the exchange.


The cookies on the white footed platter are mine. I made two types of chocolate sandwich cookies. One is a Martha Stewart recipe called Chocolate Mint Sandwich Wafers. They were fantastic. The other cookie was from Epicurious. It's a more sophisticated version of oreo cookies with a white chocolate filling. I added crushed candy canes to the filling to make it more festive. You can see the recipe here.


I asked each of the participants to send me a copy of their cookie recipes in advance, and I put them together in a little booklet. It's a great way to recreate one's favorites from the exchange.


Along with the recipe booklet, there were bags for each person to fill with cookies. I included some decorations for the kids to decorate the bags. It was a hectic party that took a lot of organization, but it was enjoyable. Nearly all of the guests e-mailed me telling me how much fun they had at the party. Let's see if we can pull it off again next year...

Holiday Baking


This was the dessert spread I made for Thanksgiving. In the background you can see an Elmo tablecloth. We usually don't decorate for Thanksgiving with Elmo, but we also celebrated my niece's second birthday at Thanksgiving. Elmo was her idea!


Thanksgiving always gives me the opportunity to test a variety of pie/tart crusts to determine which ratio of butter/shortening creates the most flaky and tender crust. It's still a work in progress, but some recipes have become staples with my family. The chocolate tart above is one of them. It's quick, easy, and requires only a few ingredients - flour, butter, chocolate, eggs, cream, and sugar.


My mom loves pecan pie, but my husband and I have never been big fans because most pecan pie fillings are too sweet and mushy. A few years ago a stumbled across a recipe that isn't too sweet. Another plus of this recipe is that there's no corn syrup in it (most pecan pie fillings use corn syrup as the main ingredient). My recipe uses good quality maple syrup to provide a more complex flavor to the filling without making it too sweet. Now my husband looks forward to eating my pecan pies!


This year I branched out and tried a variety of fruit pies. Naturally I made a double crust apple pie (I've been making this pie since I was twelve). It's my brother's absolute favorite, and I often make it for his birthday instead of a cake. Lately I've been running into a lot of problems with the filling - but more on that sad topic later. The pie still looks beautiful, and more importantly it's still loved by my brother!


My oldest sister requested that I make a cherry pie. She was craving it, so I made one for the first time. I have to admit that I didn't taste it. I couldn't manage to spend precious stomach space and calories on a pie that I'm not too fond of eating. My sister and dad loved it, so that was good enough for me. I used tapioca to thicken the cherry filling, and I used tart cherries.


The blueberry pie was a disappointment.I used frozen wild blueberries from Whole Foods because fresh blueberries are really best in the summer. The filling was too dense, and the ratio of filling to crust was disproportionate. If I make this again, I have to alter the filling to make it lighter, and I'll use fresh berries. I'm actually not a big fan of blueberry pie, but years ago when I attended my brother in-law's medical school graduation in Maine, we ate at a lobster shack along the ocean. The blueberry pie they served there was phenomenal - light, flavorful, and the crust was crisp and flaky. Since then, I've been dreaming about that pie, and one of these days I'm going to dedicate some real research and time into recreating that delicious pie.


This year's pumpkin pie had it's positives and negatives. The texture of the filling was light and creamy. Unfortunately the taste wasn't as dreamy as I'd hoped. It was too spicy - I put way too much clove and nutmeg into the filling.


I thought I didn't like banana cream pie because I must have only eaten one long ago with artificial banana flavor. Regardless, I thought I'd try to make one this year. After looking at nearly a dozen recipes, I found one that looked delicious on the Cooks Illustrated website, and I thought, "Heck. Why not try it?" The recipe is actually pretty ingenious. The custard is light and silky made with real vanilla beans. And in order to prevent the crust from getting soggy, the bananas are placed between two layers of custard. (In most banana cream pie recipes the bananas are put directly on the crust followed by the custard.) Another method the wonderfully innovative folks at Cooks Illustrated utilized was to make the crust a grahm cracker/pastry crust hybrid. Actually pieces of crushed grahm crackers are rolled into the pastry crust so that the crust has a bit more heft in order to stand up to the wet custard. I wish I could post a link to the recipe from the Cooks Illustrated website, but you have to have an on-line subscription in order to view the recipe. (If you like to cook or bake, I would highly recommend getting a subscription to the website. As a subscriber you have access to all the recipes, equipment reviews, and you can physically view archived and current Cooks Illustrated Magazines.)

The pie turned out fabulous! It took center stage at Thanksgiving, and it's now a new family favorite. My middle sister already requested it for her birthday! Who knows which pies will show up next year. Maybe a lemon meringue pie, a key lime pie, or even a sweet potato pie...

1.01.2009

My Very First...

Happy New Year! Is there a better time to start a blog than the very first day of a brand new year? I decided to create my own blog so that I could meet the requirements to join Tuesday's with Dorie. I'm very, very excited about the prospect of working through a baking cook book with a whole slew of others who are just as obsessed with baking as I am! The only worry that I have is eating the baked goods - but I've been reassured by my family that they will be more than happy to help out with the oh so difficult task of eating a wide variety of delicious sweet treats.

I've been baking every since I can remember, but the obsession really kicked in when I decided to try a few recipes for a dinner party my mom was hosting - I must have been 13 or so. By the time I was done experimenting with a few baked goods, I realized that I baked two cheesecakes, a three layered chocolate cake, and two dozen pecan cookies. As I started to explore more cookbooks and food magazines, my interest in baking grew into a bigger frenzy eight years later when I decided to make my brother's wedding cake. It was a three tier pound cake with raspberry filling, and cream cheese frosting. It was a labor of love. By the time my own engagement party came around (I wasn't going to risk baking my own wedding cake (!) the stress would have sent me over the edge!) I made a three tier chocolate fudge cake with chocolate buttercream. Then I had the brilliant idea of creating a chocolate mosaic to decorate each of the tiers. By the time I was done tempering, breaking, and attaching each little piece to the cake, the smell of chocolate made me sick (it's hard to believe that chocolate would ever make me sick). Needlesstosay I couldn't even eat a piece of the cake b/c I was so sick of smelling chocolate! Not to worry though, my inablity to consume chocolate quickly expired, and I was back to my choco-holic ways in no time!

So, baking has been a big part of my life, and thankfully eating the baked goods doesn't seem to be as important to me as the actual process of making them and seeing my family and friends enjoy them!