1.17.2011

Meat and Potatoes - Indian Style

P1070828

Meat and potatoes are comfort foods in many cultures, and that even goes for the greater culture of the Indian subcontinent (often referred to as "desi" culture). Desi is a term often used to capture the common culture shared among people from India, Pakistan, and Bangladesh (the Indian subcontinent).The term is NOT negative or demeaning. It's simply a catch-all for the various cultures of the subcontinent.

Before sharing the recipe and cooking process for desi meat and potatoes, there are a few key terms and facts I want to share with you about desi food. First of all, samosas (fried, triangular dumplings often filled with potatoes and sometimes ground beef) and biryanni (a rice pilaf often with meat) are the most commonly known desi dished because they are available at nearly every desi restaurant across the world. While samosas and biryanni are certainly eaten in desi households, they are often reserved for special occasions simply because of the advanced preparation needed for both dishes. The type of desi food that is more commonly prepared at home is a meat stew with plenty of gravy.  The term "curry" is often seen on desi restaurant menus to describe such dishes, but in my lexicon of desi cuisine, curry is not a term we (meaning my family and I) use. The stewed dishes we prepare regularly are commonly referred to as "salin", and the meat is cooked with plenty of tomatoes to create gravy (shorba), and it is eaten with rice or bread. (There are a wide variety of desi breads. The most commonly eaten are naan, roti, chapatis, and paratas.)

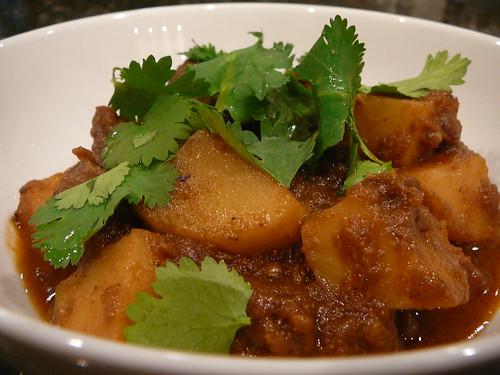
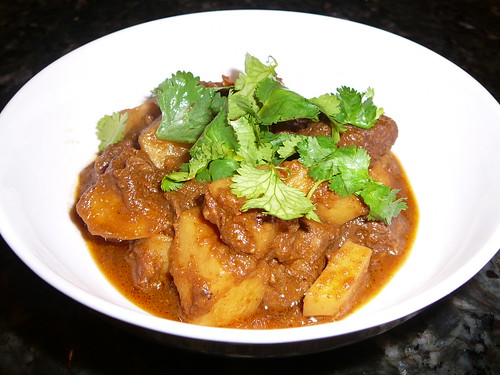
This post is a basic tutorial for making salin and specifically Aloo Gosht (meat with potatoes).This is the way my family (specifically my mother and grandmother) taught me how to make salin. I'm sure there's probably a desi or two who will read this and gasp at my methods, but hey, to each their own, right?

Ingredients:
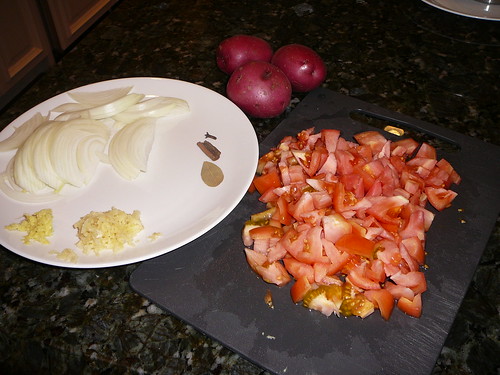
1/2 a very, large yellow onion, thinly sliced
2 medium tomatoes chopped
1 jalapeno pepper or serrano pepper
1 teaspoon of freshly grated ginger
5 garlic cloves, crushed
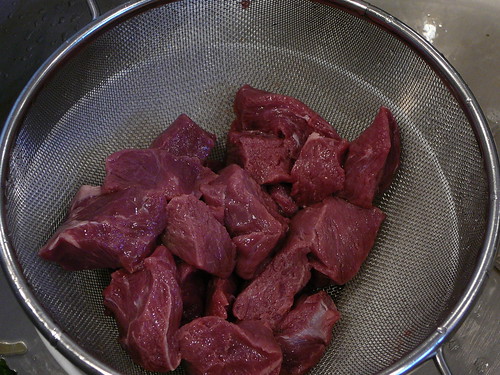
1 pound of lamb, beef, or goat (yes, goat people) (preferebly with the bone IN) (I often ask the butcher to cut up a small leg of lamb into 2 inch cubes)
Olive oil or vegetable oil (ghee or clarified butter is traditionally used, but for health reasons we use olive oil)
2 small red potatoes, peeled and cubed

Spices (masala)
1 1/2  teaspoons ground cumin (whole cumin seeds toasted in a dry pan, once cooled, ground in a coffee grinder)
1/2 teaspoon ground corriander (whole corriander seeds toasted in a dry pan and ground)
cayenne pepper - to taste
salt - to taste
a 1 1/2 inch cinnamon stick
1 bay leaf
1 whole clove


Most salin recipes call for garam masala (a blend of eight or nine spices that are roasted, ground, and mixed together), but for my basic salin recipe, I prefer to use a lot of the aromatics as whole spices rather than ground into a powder. It's simply my preference, but if you'd like, you can add 1 tsp. of garam masala.

P1070810

1 - Put a stainless steel pan over medium, low heat. Coat the bottom of the pan with oil (just enough to cover the entire surface of the pan). While the pan is heating up, wash your meat.

P1070812

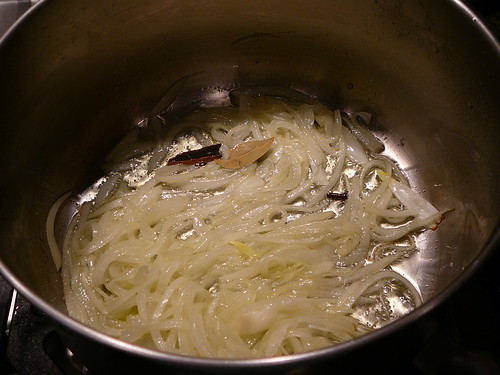
2 - Once the oil is hot (NOT smoking hot, just hot enough to begin cooking), add the sliced onions. Mixing every few minutes, saute the onions until they are soft and translucent. You do not want the onions to brown. As the stew cooks, the onions will breakdown to the point where they will become undescernable in the gravy (shorba). As the onions are softening, add the cinnamon stick, bay leaf, and clove.

3 - Once the onions are nice and soft, add the crushed garlic and grated ginger. Cook for about 30 seconds to 1 minutes (until you can smell the garlic). Make sure not to burn the garlic, or it will turn bitter. (At this stage of cooking, most people add their spices since spices bloom in oil. But I take the unorthodox route, and hold off on adding the spices because I find that they often burn while the meat is browning.)

P1070818

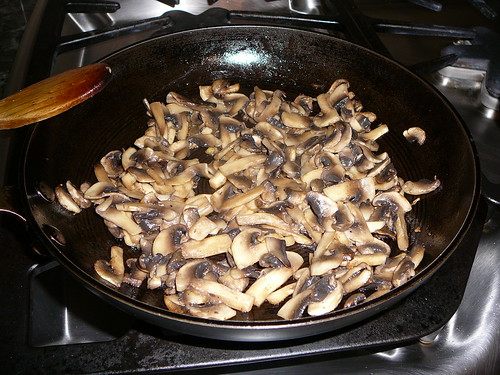
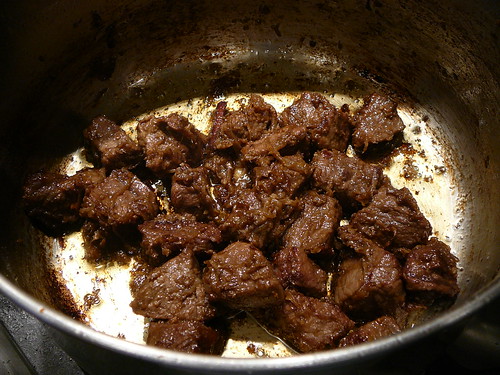
4 - Next add the meat. Browning the meat is called "bhooning" the meat. It's probably the single most important step in making salin. If you don't allow enough time for the meat to brown (bhoon) sufficiently, the salin will have very little depth of flavor. I like to bhoon my meat for at least 20 minutes. Here's the pan when the meat is first added:

P1070819

Here's what the meat looks like once it's bhooned for 20 minutes:

P1070822

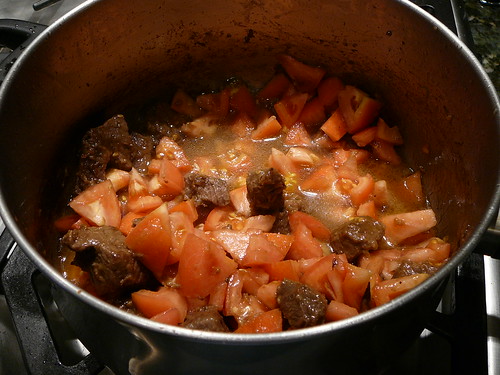
5 - Once you're meat has bhooned, add the diced tomatoes. Mix and cover. You need to cover the pot in order for the tomatoes to break down and release their liquid. At this stage I like to add a bit of salt. I find it helps the tomatoes along. Here's where the bulk of the cooking happens. You will cook the meat and tomatoes for about 1 1/2 hours (yes, that's hours) to 2 hours, mixing every 15 minutes or so. The pan should never dry out (the tomatoes are what create the gravy). That's why it's imparative to keep the pan covered. If you find the pan is drying out, add water.

Here's what it looks like when the tomatoes are added:

P1070823

Here's what it looks like after the salin has cooked for 1 1/2 hours to 2
hours.

P1070826

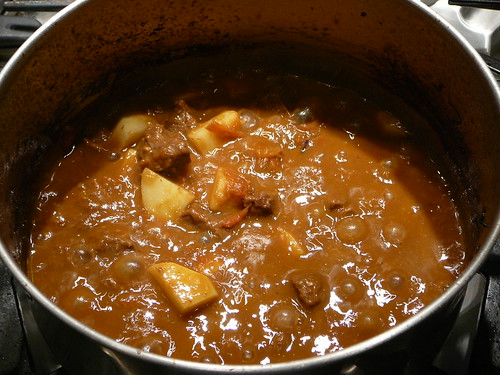
6 - At the 1 1/2 hour mark, add the diced potatoes and the ground spices. Mix and cover.

7 - With 15 minutes left, add the whole green pepper. The reason I add it at the end of the cooking is because if you add the whole pepper while the meat is stewing, it can explode; making the dish way too spicy. If you'd like to add the whole green pepper earlier in the cooking process, you can cut it, take the seeds and veins out, thus taking some of the heat away. I find adding the green pepper at the end gives the dish a bright, peppery flavor without the added heat.

You know the dish is finished cooking when the meat and potatoes are fork tender. Serve over steamed white rice or with naan or pita bread.

P1070833

12.31.2010

Pattern Block Puzzles

The Y received a Mellisa and Doug pattern block puzzle set a few months ago.

It says it for ages 2+. Y loves puzzles, so she immediately gravitated toward this gift. She figured out how to put all of the puzzles together after about two tries. She's known the name of the basic shapes (circle, oval, diamond, rectangle, square, and triangle) since she was about 20 months old. She's learning more complex shapes with the use of this toy:


 She's learned about pentagons, hexagons, octagons, trapezoids, parallelograms, etc. with her clock toy. She spends quite a bit of time taking them out, turning the pieces over, and putting them back into place. She quickly learned that the parallelogram is the only shape that cannot be put in backward!


Now that she's mastered her basic pattern block set, she started using pattern blocks for what they are meant to be used for - putting the individual shapes together to make larger, more complex shapes and designs.  One morning she was playing around with her pattern blocks, and she declared, "Look! I can put two triangles together to make a square!"

patternblocks1

patternblocks

It's amazingly fascinating and rather satisfying watching the Y explore and discover in her own way - without an adult telling her what to do and how to do it.

12.25.2010

Roasted Vegetable Quesadillas

quesadillas6

I love Tex-Mex food. I'm not quite sure why. I think there may be a few reasons. I think the primary reason is that I love most of the common ingredients found in Tex-Mex cuisine - cheese, beans, and roasted vegetables. Then there's the strong commonality of spices between Tex-Mex cuisine and Indian food (especially the cumin and cilantro). Regardless, one of our family favorites is our Roasted Vegetable Quesadillas.

The Y loves the quesadillas, and she really loves vegetables. If you ask her what her favorite foods are, she'll always include peapods, "kacha" (which means "raw") broccoli, and "kacha gobi" (which is raw cauliflower). She will literally eat a plate full of raw broccoli and cauliflower. She even gets excited when I'm chopping red, yellow, or orange bell peppers, and she'll munch on them before they're cooked. So many of my friends are shocked with they see how much the Y loves vegetables, and they often tell me stories about how their children refuse vegetables. I guess that happens with some children - they just don't like them. But, I also wonder how much of it has to do with what the children eat at home and, more importantly, what they see their parents eating. I'm nearly a vegetarian. I rarely eat red meat (maybe three times a year, if that), and when I do eat chicken or fish, it's probably twice  month at the most. The Y's papa, on the other hand, is a "hard core" carnivore. Meaning, he loves, loves meat. The Y eats every meal with me, thus she sees how much I love vegetables. And even when I cook meat for the Y's papa, there's always a vegetarian alternative (which I eat). Since the Y was born, she's been surrounded by so many vegetables, and I really think that's why she loves them so much. Regardless of the "why" she loves vegetables, I'm just so happy that she does. I'm hoping it will influence her eating habits throughout her life.

Evidence of the Y's desire to eat veggies. Here's her booster chair tray at the beginning of dinner:

quesadillas7

Here it is 15 minutes later:

quesadillas8

On with the recipe for the Roasted Vegetable Quesadillas. I rarely use specialty ingredients in my cooking, but I think the single ingredient that makes these quesadillas so savory and unique is the use of smoked Spanish paprika. It brings a smokiness and depth of flavor to the vegetables after roasting them for a mere 25 minutes. You can find it at Whole Foods and on the internet.

quesadillas5

Here's the recipe:
Ingredients:*
3 bell peppers (red, yellow, and orange are our favorite. We don't like the green ones because they have a much harsher flavor)
2-3 medium sized zuchinnis
2 medium sized summer squash
1 8oz container of mushrooms
1 medium red onion

(honestly you can put any vegetables you like, sometimes we add jicama or sauted spinach)
10 whole wheat flour tortillas
Shredded cheese (we like the cheddar-jack cheese combo)

For the black beans:
2 8oz. cans of black beans
1/4 red onion, chopped fine
1 teaspoon cumin
1/2 teaspoon of corriander
2 tablespoons lime juice
Salt and pepper to taste


For the guacamole:
2 avacados
1 small clove garlic - minced
1/4 of red onion chopped, fine
1 tablespoon tomato chopped fine
lime juice to taste
salt and pepper to taste

For the Spice Rub:
2 teaspoons smoked Spanish paprika
1 teaspoon regular paprika
3 teaspoons chili powder (NOT cayenne pepper, rather the spice mix with cumin, paprika, etc.)
2 teaspoons garlic powder
1 teaspoon of dried oregano

Condiments:
Sourcream
Salsa
Chips

Directions:
1 - Preheat the oven to 425 F. Chop the vegetables so they are bite-sized, and try to make them uniform in size so they will cook at the same rate.Mix the spice rub in a small bowl. Place all the vegetables on a baking sheet. Drizzle the vegetables with olive oil, and sprinkle spice mix and salt over vegetables. Mix the vegetables to coat all of them with the spice rub. Place in the oven to bake for 25 minutes.

quesadillas2

2 - While the vegetables roast, make the black beans and saute the mushrooms (and spinach if you are using it). For the black beans, saute the onions in a bit of olive oil and saute until they are soft but not brown. Add the cumin and corriander, and cook until you can smell the spices (about 30 seconds). Drain and rinse the beans.  Add them to the pan and mix. Since the beans are already cooked, simply cook them long enough to absorb the flavor of the spices and onion. After about 3-4 minutes, add the lime juice. Mix and cook for a minute or two longer. Add salt and pepper to taste. For the mushrooms, slice them and saute them in a pan with olive oil. Add salt and pepper to taste. Set the beans and mushrooms aside while the vegetables finish roasting.

quesadillas4

3 - Once the vegetables come out of the oven, make the guacamole. Mix all the guacamole ingredients, and taste to make sure there's an adequate amount of lime juice and salt and pepper.

4 - Heat a large frying pan over medium heat. Do not put oil in the pan and start assembling the quesadillas. First place the tortilla in the pan, then add shredded cheese to half of the tortilla. Next layer on the roasted vegetables, mushrooms, and black beans. Top with more cheese and fold the tortilla in half. (I like placing the cheese right next to the tortilla because the melted cheese acts as a glue to hold the quesadilla together). Once the tortilla is brown and crisp on one side, flip it over, and allow the other side brown. Remove from heat, and place on a cutting board. Cut the quesadilla into thirds. Serve with sour cream, guacamole, salsa, and chips.

*If you want to add chicken to the quesadillas, an hour before cooking, marinate 3 skinless, boneless chicken breasts in the juice of one lime and olive oil. Heat up a grill pan. Before placing the chicken on the grill, sprinkle it with salt and some of the spice mixture for the vegetables. Grill for about 7 minutes per side (the cooking time depends on the temperature of the pan and the thickness of the chicken). Once the meat has been removed from the grill and rested for 10 minutes, slice into bite-size pieces, and add into the quesadilla.

quesadillas3

12.22.2010

Raspberry Chocolate Rugelach

P1050239

Since I'm the youngest in my family (the youngest child of four), I have very fond memories running errands with my mom. She was an amazing stay-at-home mom who truly put her children first. Since there was no babysitter or nanny, wherever my mom went, we went along; especially me because I was the youngest. Often when we'd be running errands, my mom would stop at a local bakery to pick some treats up for my siblings for their after-school snack. When we'd go to the bakery, me and my older sister, Nadia, were always allowed to pick two or three cookies for ourselves. I can remember looking in the cookie case at all of the colorful cookies topped with chocolate, sprinkles, and decorative sugar. I think they were mostly butter cookies or sugar cookies just decorated differently, but I remember thinking that they each looked like jewels sitting under the lights of the cookie case. My sister always chose some jam filled cookie, and for whatever reason, I always chose these butter cookies that were twisted into the shape of a pretzel then dipped into white chocolate coating. Why would I choose a plain white cookie when there were fancy-pants decorated cookies? I have no flipping idea. I really think it was an inability to decide which fanciful cookie to choose that propelled me to choose the most bland, plain cookie in the entire place. Now whenever I go into an old-school American bakery and I see a sugar cookie pretzel dipped into white chocolate, I give into the memory of buying them in my childhood. But every time I bite into one, I'm disappointed. It tastes just as boring as it looks. My sister, on the other hand, still loves jam-filled cookies. So whenever I make a jam-filled cookie, there's always a nod to my sister, and she often gets a little bundle of cookies just for herself.

I originally made these raspberry chocolate rugelach cookies for the Mother-Daughter Cookie Exchange in 2009. Since then I've made them quite a few times. Since my sister loves jam-filled cookies, so I know I'll always have an appreciative audience.  I always thought they were over-rated, but I have to admit, I really liked these. The cream cheese dough is not too sweet, and it's serves as a nice crumbly texture against the sticky, sweet jam filling. And of course, I think the chocolate only made it better!

The dough is actually quite sticky once it's made. So allowing the dough to chill thoroughly is very necessary. I made the dough the night before rolling them out, thus ensuring the dough was nice and firm.

P1050201

The recipe specifies dividing the dough into half, wrapping them separately to chill and roll out. I made a triple batch of the recipe, thus resulting in six dough disks.

P1050204

I wrapped them individually in cling-wrap before chilling. At this point, I've actually frozen the dough for up to one month. Defrosting it in the fridge over night before proceeding with the recipe, and it works perfectly.

P1050205

If I were a true perfectionist, I would have rolled the dough out into a perfect circle, but alas, I obviously didn't take the time to do just that. I smeared the dough with raspberry jam an sprinkled it with mini-chocolate chips.

P1050211

After cutting and rolling the rugelach, I thought they looked delectable (although, not perfect). Before baking, I brushed them with egg wash and sprinkled a mixture of cinnamon and sugar on top.

P1050218

Here's the recipe. It's adapted from The America's Test Kitchen Family Baking Book.
Ingredients:
 For the dough:
1 stick unsalted butter, softened
4 ounces cream cheese, softened
1 tablespoon sugar
1/2 teaspoon salt
1 cup (5 ounces) flour

For the Filling:
1/3 cup (2 1/2 ounces) of sugar
1 tablespoon of ground cinnamon
1/2 cup raspberry jam
1 cup (four ounces) mini-chocolate chips
2 tablespoons unsalted butter, melted

For the dough:
Beat the butter, cream cheese, sugar, vanilla, and salt together until light and fluffy. Occasionally stop the mixer to crape down the sides of the bowl. Reduce the speed of the mixer and add the flour. Mix until just combined.

Turn the mixture out onto a floured counter, divide it into two equal pieces. Wrap in plastic wrap, an d refrigerate until firm, about one hour. Pre-heat the oven to 375 F. Line two large baking sheets with parchment or a silpad.

Assembling the cookies:
Roll each piece of dough into an 11 inch circle, about 1/4 inch thick. Spread about 1/4 cup of the jam on top of each round. Then sprinkle each with 1/2 cup of chocolate chips and 1 tablespoon of the cinnamon sugar.

Using a pizza cutter, cut each dough round evenly into 16 wedges. Starting at the wide end, roll up each wedge into a cookie. Place the cookies on the prepared baking sheets, with the pointed end underneath. Place them about two inches apart.

Brush the melted butter over the cookies and sprinkle with the remaining cinnamon sugar. Bake the cookies until pale gold and slightly puffy, about 20 min. Immediately transfer the hot cookies to a wire rack and let cool completely before serving (about an hour).

Makes 32 cookies.

12.21.2010

Cookie Exchange 2009

cookie exchange booklet

Yes - that's right, this post is about our annual Mother-Daughter Cookie Exchange in 2009. It isn't a typo. I'm just a horrible procrastinator. I'm hoping I post about this year's cookie exchange before 2011.

The Second Annual Mother-Daughter Cookie Exchange was held in the basement this year. Last year I did it on the main floor of our house, and it was a huge mess. I don't know what I was thinking. Mixing little children, cookies, and sugar-over load was just a recipe for disaster. Then again I was only four months post-partum for the first cookie exchange, so who knows what my sleep-deprived brain was thinking. I probably wasn't thinking too clearly at all. The other big difference between the first and second cookie exchanges is the activities. The 2009 cookie exchange featured three different activities. The first was cookie decorating. They decorated sugar cookies in the shape of mittens.

cookie exchange sugar cookies

Here's one of the two cookie decorating stations. There were a variety of candies and frosting colors available to the girls for decorating.

cookie exchange decorating station


Here's are some completed cookies. Some children took the opportunity to dump as much candy on to their cookie in hopes of chowing down on the treats for days to come.

cookie exchange3

cookie exchange2

cookie exchange1

One of the other activities I thought would be fun was a watercolor crayon relief project. The children used white crayons to draw on white paper. Then they used the watercolors to "reveal" the drawing they made with the white crayon.

cookie exchange activity1

The last activity was a tissue paper craft. I didn't realize that they well pre-cut squares of tissue paper. The time I would have saved if I had known that...

Cooke exchange activity2

This is the sample I made to help demonstrate the activity.

cookie exchange activity2 sample

Finally, here's a picture of all the cookies. The table wasn't quite complete when I took the photo, but you can see my contributions.  I made the chocolate candy cane cookies and the rugelach. You can find my post about the chocolate candy cane cookies here and the rugelach here.

cookie exchange spread

Stay tuned, I'm hoping to post about the Third Annual Mother-Daughter Cookie Exchange soon!

12.20.2010

Whole Wheat Waffles

P1060893_2

For as long as I can remember, Sunday morning breakfasts have been special. Actually it was our Sunday brunch that provided a platform for me and my siblings to experiment with cooking. When my siblings and I took over the brunch-making duties from my parents we were making pancakes from Bisquick mix, and it was a feat to make an omelet without it falling apart. When my older sister, Nadia,  was probably eleven or ten she decided to write everyone's name on their pancakes. And she wrote our names in cursive. Yup, cursive. It wasn't like a needed another reason to want to be just like Nadia, but the cursive-personalized pancakes was just another reason I wanted to be cool like her.  Heck, I was eight years old at the time, so being impressed by my older sister wasn't too difficult. But honestly, it was the creativity of my older sibs opened the flood gates for new recipes. We tried stuffed french toast, crepes, and even homemade bread.

Now that I have my own little family, we've also adopted the Sunday brunch tradition. We forgo the weekday cereal and oatmeal, and opt for a real breakfast with both savory and sweet options. That usually translates to an egg dish (usually an omelet but on special occasions we have poached eggs with roasted mushrooms), potatoes, toast, and pancakes. Occasionally we have sticky bun, cinnamon rolls, homemade bread, or banana chocolate bread. But there's been a recent addition to the regular Sunday morning lineup: waffles! My sister in-laws got me this waffle maker for my birthday:


It's called the Presto 3510 FlipSide Belgian Waffle Maker.

It is reasonably priced (it sells on Amazon for about forty dollars and qualifies for free shipping) and cooks waffles consistently and evenly. I have yet to be letdown by my new gadget. I tried a few recipes for waffles, some made with yeast (they were too dense for my taste), some with buttermilk, and some with wholewheat. After quite a bit of sampling we've found a favorite. I'm not sure where this recipe came from because my sister in-law adapted it from a website she found, and I slightly adapted her recipe to make it my own. 

Ingredients:
2 cups whole wheat flour (this can be substituted with white wheat flour, I've used the King Arthur brand of white wheat flour and it's worked out well)
2 large eggs
2 cups of milk
1/2 cup of vegetable oil
2 teaspoons brown sugar
4 teaspoons baking powder
1/4 teaspoon salt
1 teaspoon vanilla
1/2 teaspoon of cinnamon

Mix all the dry ingredients in a large bowl (flour, sugar, baking powder, salt, and cinnamon). In a separate bowl mix the milk, eggs, vegetable oil, and vanilla. Add the wet ingredients to the dry ingredients and whisk together. Follow the directions for your own waffle iron. On my waffle iron it makes five full sized waffles (I often make only a quarter of a waffle for the little Y).

12.18.2010

Potty Training - Day #2

It's below zero outside. The wind is howling. Why not potty train? I know it sounds like a non sequitur, but there's some logic behind my thinking. I'm sure there are tons of valid ways to potty train a child, and my general philosophy toward parenting is: "Do whatever is right for your child and your family." That being said, after some reading and a lot of discussions with my two sisters (who have eight children between them - seven of eight who are potty trained), I decided to stay home for the next seven to ten days (!) while we potty train.  That way I can avoid the use of pull-ups or diapers during the day.  Thus, the winter time is perfect - we can't really spend a lot of time outside and we're already relinquished to activities at home, so why not be productive with the potty training?

The Y has actually been using the toilet since she was about 18 months old. She started to tell us when she had to pee and poo at 12 months, so her pediatrician suggested we start putting her on the toilet before her shower. By the time Y was 18 months old, she peed and pooped on the toilet every night before her shower. So, the potty training has been going pretty smoothly - no fears about flushing or pooping on the toilet. She actually has a revolving stack of books by the toilet to keep her company. The only hick up in the training is that she doesn't want to stop playing to sit on the toilet.  So my solution has been to put her on the toilet (no questions asked) every 15 to twenty minutes.

The Y has a toilet seat that fits over the regular toilet seat.  It has her favorite sesame street characters on it: Elmo, Dorthy, Ernie, Rubber Ducky, Oscar, Slimy, and Cookie Monster.  She also has one of these:


I have to admit that I'm getting crazy staying at home. I never realized how much we value being out and about on play-dates, in nature, or even going to the grocery story! In an attempt to keep myself from going crazy we are working on a few projects - an alphabet book, baking, and I've been knitting some fruits and vegetables for the Y's shopping cart.

P1070481

This is how she received her shopping cart on Eid morning. When she saw her shopping cart, she started clapping, screaming, and running around in circles. She'd been asking for a shopping cart for the past six months or so. But, it couldn't be any shopping cart. She specified that it had to be like the Trader Joe's one - "hard" and "silver." Basically she refused to have a plastic cart because as she put it, "those aren't real shopping carts." In the bottom of the cart you can see some knitted apples, lemons, and eggplants. While we chat in the bathroom while the Y "reads" and tries to poop, I've been knitting some pears to add to the cart. Hopefully I'll post a whole blog entry on the knitted fruits and veggies once they are complete.

I'm hoping that ten days from now we'll be pretty much diaper-free in our household. Now only if we can get through the next eight days without going crazy from cabin-fever!